 World inside pictures Collect and share the best ideas that make our life easier
Are you looking to lower down your home’s monthly energy consumption? Are you considering installing solar panels?
The number of American households using solar panels continues to increase. In 2016, solar power installations accounted for the largest share among electricity generating sources in the United States.
But you may ask, isn’t a solar panel installation too complicated?
Believe it or not, installing a solar panel over your roof is not as complex as you think. In fact, you can even perform the installation yourself.
Continue reading below to find out how.
Solar Panel Installation: The Ultimate Guide
If you want to put an end to rising energy bills, it’s time to consider installing solar panels. Not only does it lower your energy expenses, but it is also one of the most cost-effective solutions. Check out this guide on how to install solar panels.
- Initial Evaluation
First and foremost, you need to conduct an initial evaluation of your roof. You need to make sure that your roof is sturdy enough to support the weight of the panels.
Your roof’s structural integrity is non-negotiable. If you install panels over a weak roof, the latter will likely cave in.
Some homeowners find the first step challenging. This is normal. The typical homeowner does not know how to check the roof’s integrity accurately.
In such cases, you may want to consider hiring a professional evaluator.
Another aspect you need to consider during the evaluation is the wiring of your home. This is crucial since you want to make sure that everything is compatible with your new source of energy. The evaluator will check your home’s electrical panel.
He will tell you if you need an upgrade or if the current setup will suffice. If they see that your new solar panels require more amps, you will need to increase the ampere capacity of your electrical box.
This step may take some time and effort. However, you should treat it as part of the growing pains toward a more sustainable home.
- Get Busy with the Paperwork
The next thing you need to deal with is the paperwork. You need to apply for different federal and state solar incentives. These include the clean energy financing initiatives; the federal ITC; and the solar renewable energy certificates (SRECs), among others.
You also need to deal with the building permits. Keep in mind that these permits vary from state to state. There are areas that allow installation over their entire roof surface. There are also areas that require three-foot spacing on the roof.
- Get the Dimensions
If you are not using solar roof tiles, then you need to measure the dimensions of your roof. This is vital since you want to ensure that your panels fit perfectly on your roof.
When determining the dimensions, ensure that you have foresight. This means considering space where you can add more panels in the future.
You also want your panels to face the direction where the sun comes up. For example, if the sun rises in the east, you should install your panels facing the east. Doing so will provide maximum sun exposure for your panels.
Lastly, you need to ensure that the area where you wish to install your panels has no shade. This means other houses, buildings, or trees must not shade the panels from the sun.
Keep in mind that it only takes one panel in the shade to stop your entire solar array from working properly.
- Order the Equipment You Need
After securing your roof’s dimensions, you are now ready to choose your panels and inverters. Start your research and due diligence. Go online and check the offerings coming from the top solar companies in the country.
Read up on the pros and cons of string inverters, microinverters, and power optimizers. Some of the key factors to consider include efficiency, durability, and aesthetics. You want to invest in solar panels that don’t affect your home’s aesthetic value negatively.
After completing your research, order the equipment you need. You can shop online or go to physical stores that offer solar panels.
- Install the Brackets
Before you proceed with the actual installation of the panels, you must first put up brackets or mount rails. These things will support your solar array.
Install brackets if your roof is the sloping type. If your roof is flat, go for the mount rails. You can get them from solar panel stores or your friendly home improvement shop.
Always remember that the slope on your roof must have a position that yields direct sunlight exposure. On the other hand, the mount rails will allow you to adjust the panels in any angle you desire. The key, however, is to ensure that your panels must have the exact height and angle.
This will ensure the panels will generate the same level of voltage production.
When installing the brackets and panels, you need to secure their stand-offs against your home’s rafters or trusses. After installing the brackets or rails, make sure to put roof sealant on the screw holes. This protects your roof from leaking whenever rains occur.
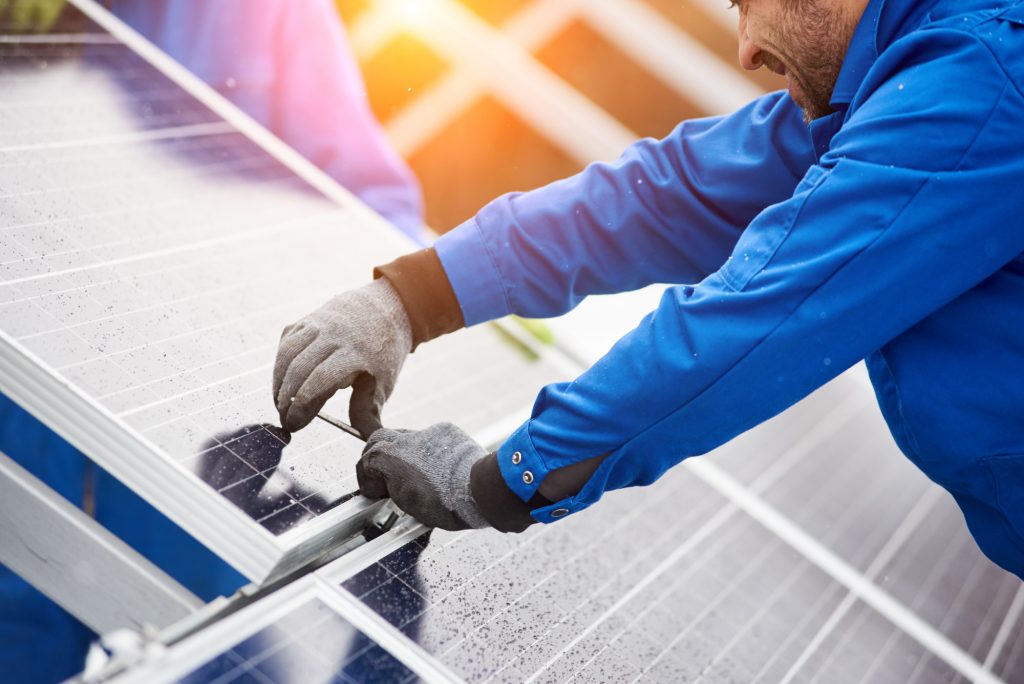
- Install the Panels
Hoist your solar panels up to your roof. Lay them out one-by-one onto the mount rails or brackets. Fasten them securely.
When working on a sloping roof, make sure your solar panels don’t slide off by accident.
- Mind the Wiring
Your panels now fit nice and snugly. It’s time to connect them together. Your wires must have insulation. You should also wrap them in black electrical tape.
This will ensure that your wires are waterproof.
Connect a ground wire to the earth. This wire should come from the mounting hardware. This will help prevent the possibility of shock.
Always remember that you will use three types of wires: positive, negative, and ground. Make sure that any of these three is not in contact with your actual roof.
You also need to install conduit over the wires. The conduit should run underneath the solar panels leading to a junction box. Place the box down the side of your house.
After the junction box, the conduit must reach your system’s first photovoltaic component. This is normally the DC disconnect.
Now follow the manufacturer’s instructions regarding the photovoltaic component set up. You need to install these components as well as your inverter preferable inside your garage.
Make sure that the area has ample ventilation. Keep the space dry. Make sure extreme heat and cold do not affect the area.
- From Inverter to AC Breaker
The final step involves running the power coming from your inverter into the AC breaker, as well as other system components. To pull this off, start by switching the main breaker. De-energize all of your home’s AC and DC power sources.
Connect the inverter to your AC breaker panel. Follow this up by connecting the PV wires. You should connect these wires to DC disconnect switch alongside the other photovoltaic components.
Do so until the wires reach the main DC disconnect.
Complete the process by connecting the main DC disconnect to your inverter. Now try turning on the AC/DC switches, as well as the breakers. This setup should send electricity to the AC breaker panel.
In turn, it should distribute energy to all of your electrical items at home. We firmly advise that you contact an electrician to evaluate the safety of your work.
Safety Matters
Before proceeding with the actual installation, keep in these valuable safety tips.
Your Footwear
Invest in roof-ready boots. These shoes come with flat soles that provide ample grip on your roof. These shoes will add stability and traction especially if you are at a steep angle.
Wear Rubber Gloves
You also need to wear rubber gloves when installing your solar panels. Moreover, make sure to use insulated tools.
Take all conductive items off your body. These include your watch, jewelry, or any other item that may cause electrocution.
Don’t Do It Alone
As much as you don’t want to hassle other people, it is best if you install the panels with someone by your side. Solar panel installation involves a lot of lifting and moving around. You are in a compromising spot and one wrong step can lead to an accident.
If you have other people around, you can have someone else do the carrying. And if anything bad happens, someone can call for immediate help.
Make sure your friends or relatives also wear the same safety gear as you do.
Improve Other Areas Too
Solar panel installation is one of the smartest investments for your home. It makes your house more sustainable. It brings down your monthly electric bills.
But you shouldn’t stop there. There are other areas in your home that also require improvement. There are spaces you can turn into more functional ones.
Feel free to check out our different home improvement articles. We give tips on updating your bathroom on a budget. We also discuss different ideas that will improve your kitchen.