 World inside pictures Collect and share the best ideas that make our life easier
Many homes use oil heaters to keep the cold out during the frosty winter season. With the festive season nearly upon us, is your oil tank still operating efficiently? There’s nothing worse than losing the heat when you need it the most. Many people believe that oil tank systems are no longer the optimal home heating solution and have chosen to install cleaner systems that operate with natural gas fuel.
However, the homeowner that wants to either install a new oil tank system or upgrade to a gas heating system will still need to remove their old oil tank. This process can be tricky and involve a lot of paperwork and regulations that need to be followed. However, the satisfaction of getting the job done and setting up your brand new heating system is well worth the effort required.
Here is a five-step guide that any DIY enthusiast can use to remove an old oil tank from their home. All it takes is the right tools and some elbow grease, and you will have the job done in no time. Before you begin your removal process, check with your state guidelines. Each state will have strict policies on the removal of old oil tanks, acquiring the necessary permits and the regulations surrounding the handling, removal, and recycling of the tank, its parts, and the old oil. Remember to include your safety and lifting equipment from Tway Lifting before you get started.
#1 Pumping Old Oil from the Tank
The first task that needs to be completed in removing your old oil tank is to get rid of all of the old oil left in the vessel. The uncontaminated fuel is still usable, so it’s important to salvage as much of it as possible. Connect a hose to an explosion-proof pump that will transfer all of the old oil out into a drum. This recovered oil can be remediated and used in your new oil tank.
#2 Cutting Open the Tank
This step may seem like the scary part of the job. Relax, if you think you will burst into flames when you cut into the tank, then you have nothing to fear. The old oil will have a relatively high flash point; this means that any sparks emitted from your cutting tool will no present a fire risk. Use a reciprocating saw to slice into the tank and expose the interior.
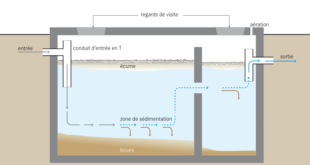
#3 Cleaning the Tank and Recycling Sludge
Your tank will need to be cleaned before it can be safely disposed of and recycled. Every oil tank will accumulate particles of oil over time. These particles settle on the bottom of the tank and form a thick sludge that will need to be salvaged before you remove the tank. A 55-gallon drum should be more than sufficient to complete this task. Fill the drum with the sludge and then arrange for a local waste-management facility to collect it from your home. The sludge will then be recycled and burned for industrial purposes.
#4 Cutting the Pipes
The last thing we want to happen is for a new oil delivery to develop into a disastrous spill. Therefore, it’s important to cut and seal the piping correctly. Begin by severing the tanks vent and fill pipes. Once this task is completed, fill the remaining exposed holes with a concrete-patch. This patch will ensure that there are no leaks from the pipe work or the tank.
#5 The Final Removal
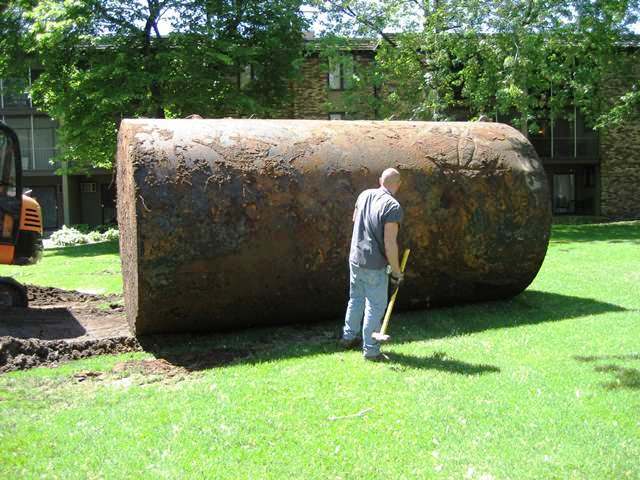
Now that the process of dissembling the tank is completed, it’s time to get it out of your basement and off to the scrapyard. The old oil tank will be thoroughly inspected and then safely recycled by the scrapyard. The most straightforward method of getting the tank out is to remove it through the basement bulkhead. If your basement bulkhead is too narrow to accommodate the girth of the tank, then you may need to cut the tank in half or vacate it from the premises through the stairwell.
In Closing
Removing your old oil tank can be a frustrating experience for any DIY enthusiast. If you are unsure that you are up to the task, then consider working with Oil Tank Experts that will provide a perfect, guaranteed installation of your new oil tank. Some jobs around the home are best left to the professionals, so kick back and relax while the industry leaders install your new tank that will last for years into the future.